Coding Builder Modules
This tutorial will show you how to code your own custom addons/modules for Themify Builder.
Let's Get Started
Each module in the Builder consists of two files, a module-*.php file (registers the module and its options), and a template-*.php file (handles the display of the module). These file for the default modules that come with the Builder are located in the themify-builder/modules directory inside the Builder, and the template files can be found in the themify-builder/templates directory.
We can add new modules via a plugin, or include them in the theme.
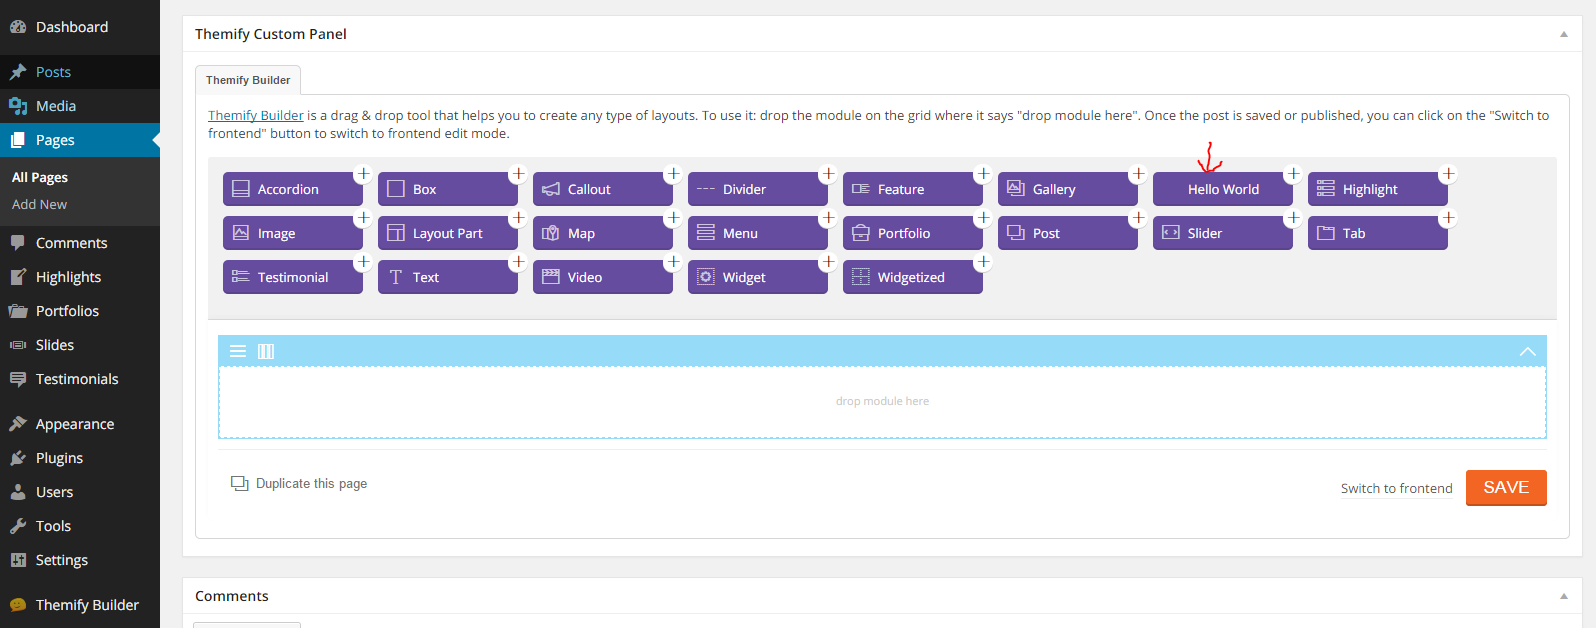
Example 1: Hello World module
Let's start by creating a simple module that displays a Hello World message. First under wp-content/plugins/ directory of your WordPress installation create a new folder (you can name this folder anything that you would like). This folder will hold all of the files required for the module. Inside that folder create a file named "init.php" and paste this inside:
<?php
/*
Plugin Name:  Hello World
Version:      1.0
Author:       Themify
Description:  Sample Builder module to greet the world!
*/

defined( 'ABSPATH' ) or die;
This is all that is needed for WordPress to identify the plugin, now if you head over to the Plugins manager in admin dashboard, you can activate it.
Now let's add the codes to register the directories where the Builder can load our module and it's template files:
function hello_world_register_module( $ThemifyBuilder ) {
	Themify_Builder_Model::register_directory( 'templates', plugin_dir_path( __FILE__ ) . '/templates' );
	Themify_Builder_Model::register_directory( 'modules', plugin_dir_path( __FILE__ ) . '/modules' );
}
add_action( 'themify_builder_setup_modules', 'hello_world_register_module' );
This tells the Builder to look for the module's definition file inside the /modules folder in our plugin, and to look for the module's template file inside the /templates directory in our plugin, so create those two folder. Next, create "module-helloworld.php" file inside the modules folder and paste:
<?php
if ( ! defined( 'ABSPATH' ) ) exit; // Exit if accessed directly

class Hello_World_Module extends Themify_Builder_Component_Module {
	function __construct() {
		parent::__construct(array(
			'name' => __( 'Hello World', 'hello-world' ),
			'slug' => 'helloworld'
		));
	}

	public function get_visual_type() {
		return 'ajax';
	}
}

Themify_Builder_Model::register_module( 'Hello_World_Module' );
By extending the "Themify_Builder_Component_Module" class in our code and then using the Themify_Builder_Model::register_module method call we have registered the module, and here it is:
Now, you may run into a slight issue, the Builder might not save the module. This is due to the fact that the module has no options, since there are no options set when adding the module to a page, the Builder removes the module. We can fix this by adding options to the module. To do this we need to add get_options method to the Hello_World_Module class and return an array of option definitions:
	public function get_options() {
		return array(
			array(
				'id' => 'module_title',
				'type' => 'title',
			),
		);
	}
This defines one option for the module, now when you add a module you can see the option to set the module title:
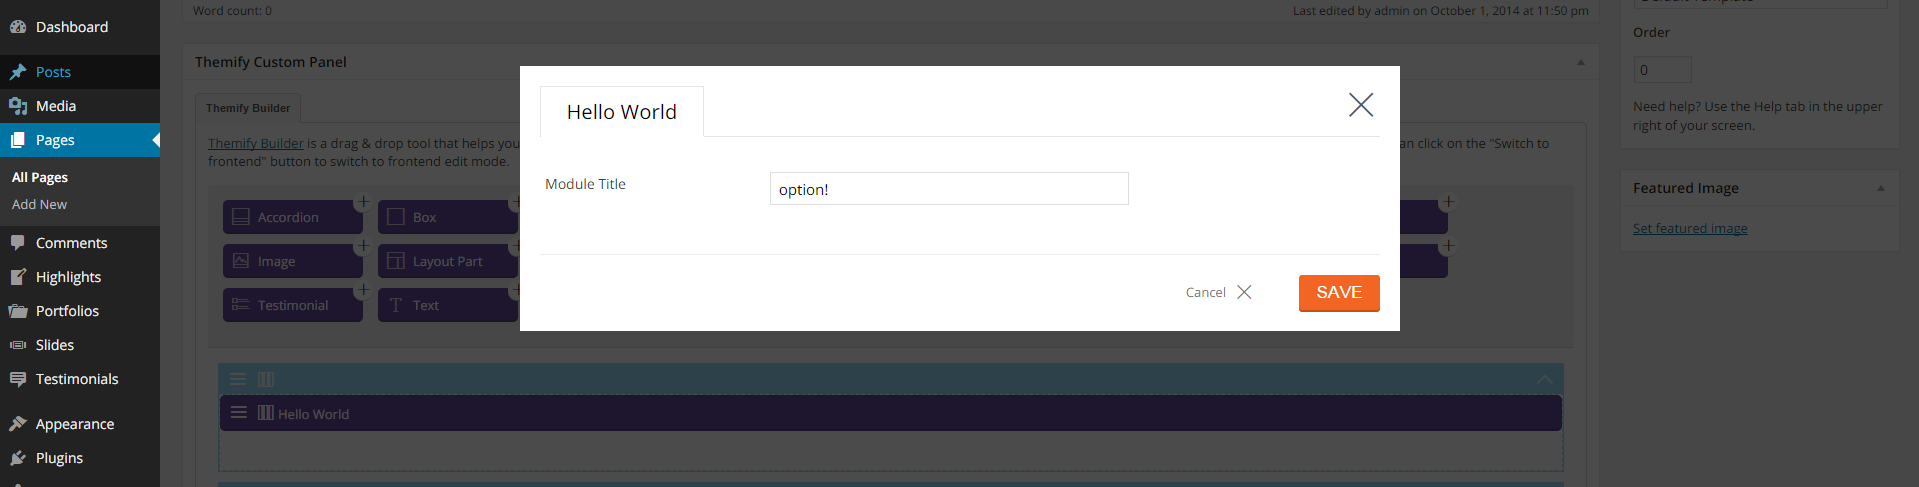
Note: if the option does not show up, it's because Builder caches the module settings on frontend for faster loading. To fix this you can do one of three things:
- Clear the browser cache (+)
- Check the page in Incognito mode (+)
- Bring up Console (+), type this line and hit Enter to execute:
localStorage.removeItem( 'tb_form_templates_' );
So what does the module display on the front end? At the moment, nothing. We haven't add the template file for the module that will actually render it, to do that create "template-helloworld.php" file inside the /templates folder and paste this in:
<h1> Hello World! </h1>Viola! Now if add the module to a page and view that page on front end, you can see the output:

Showing the same HTML snippet each time we add the module might be what we need, however often you want to add options to the module that dynamically changes it's output, so let's change the get_options method to show an option where we can change who we want to say hello to:
	public function get_options() {
		return array(
			array(
				'id' => 'say_hello',
				'type' => 'text',
				'label' => __('Say hello to:', 'hello-world'),
				'class' => 'large'
			),
		);
	}
In the module's template file the options are accessible using the $args['mod_settings'] array, every key of this array is an option saved for the module, so now change the template file:
<h1> Hello <?php echo $args['mod_settings']['say_hello']; ?>! </h1>
Congratulations, you just made your first Builder module. You can download the complete code here.
Example 2: Quotes module
Now let's dig deeper and create a more practical module. Let's say our client runs a heavy-content website and regularly posts quotes, so to pimp up the pages let's design a quote style module that our client can use:
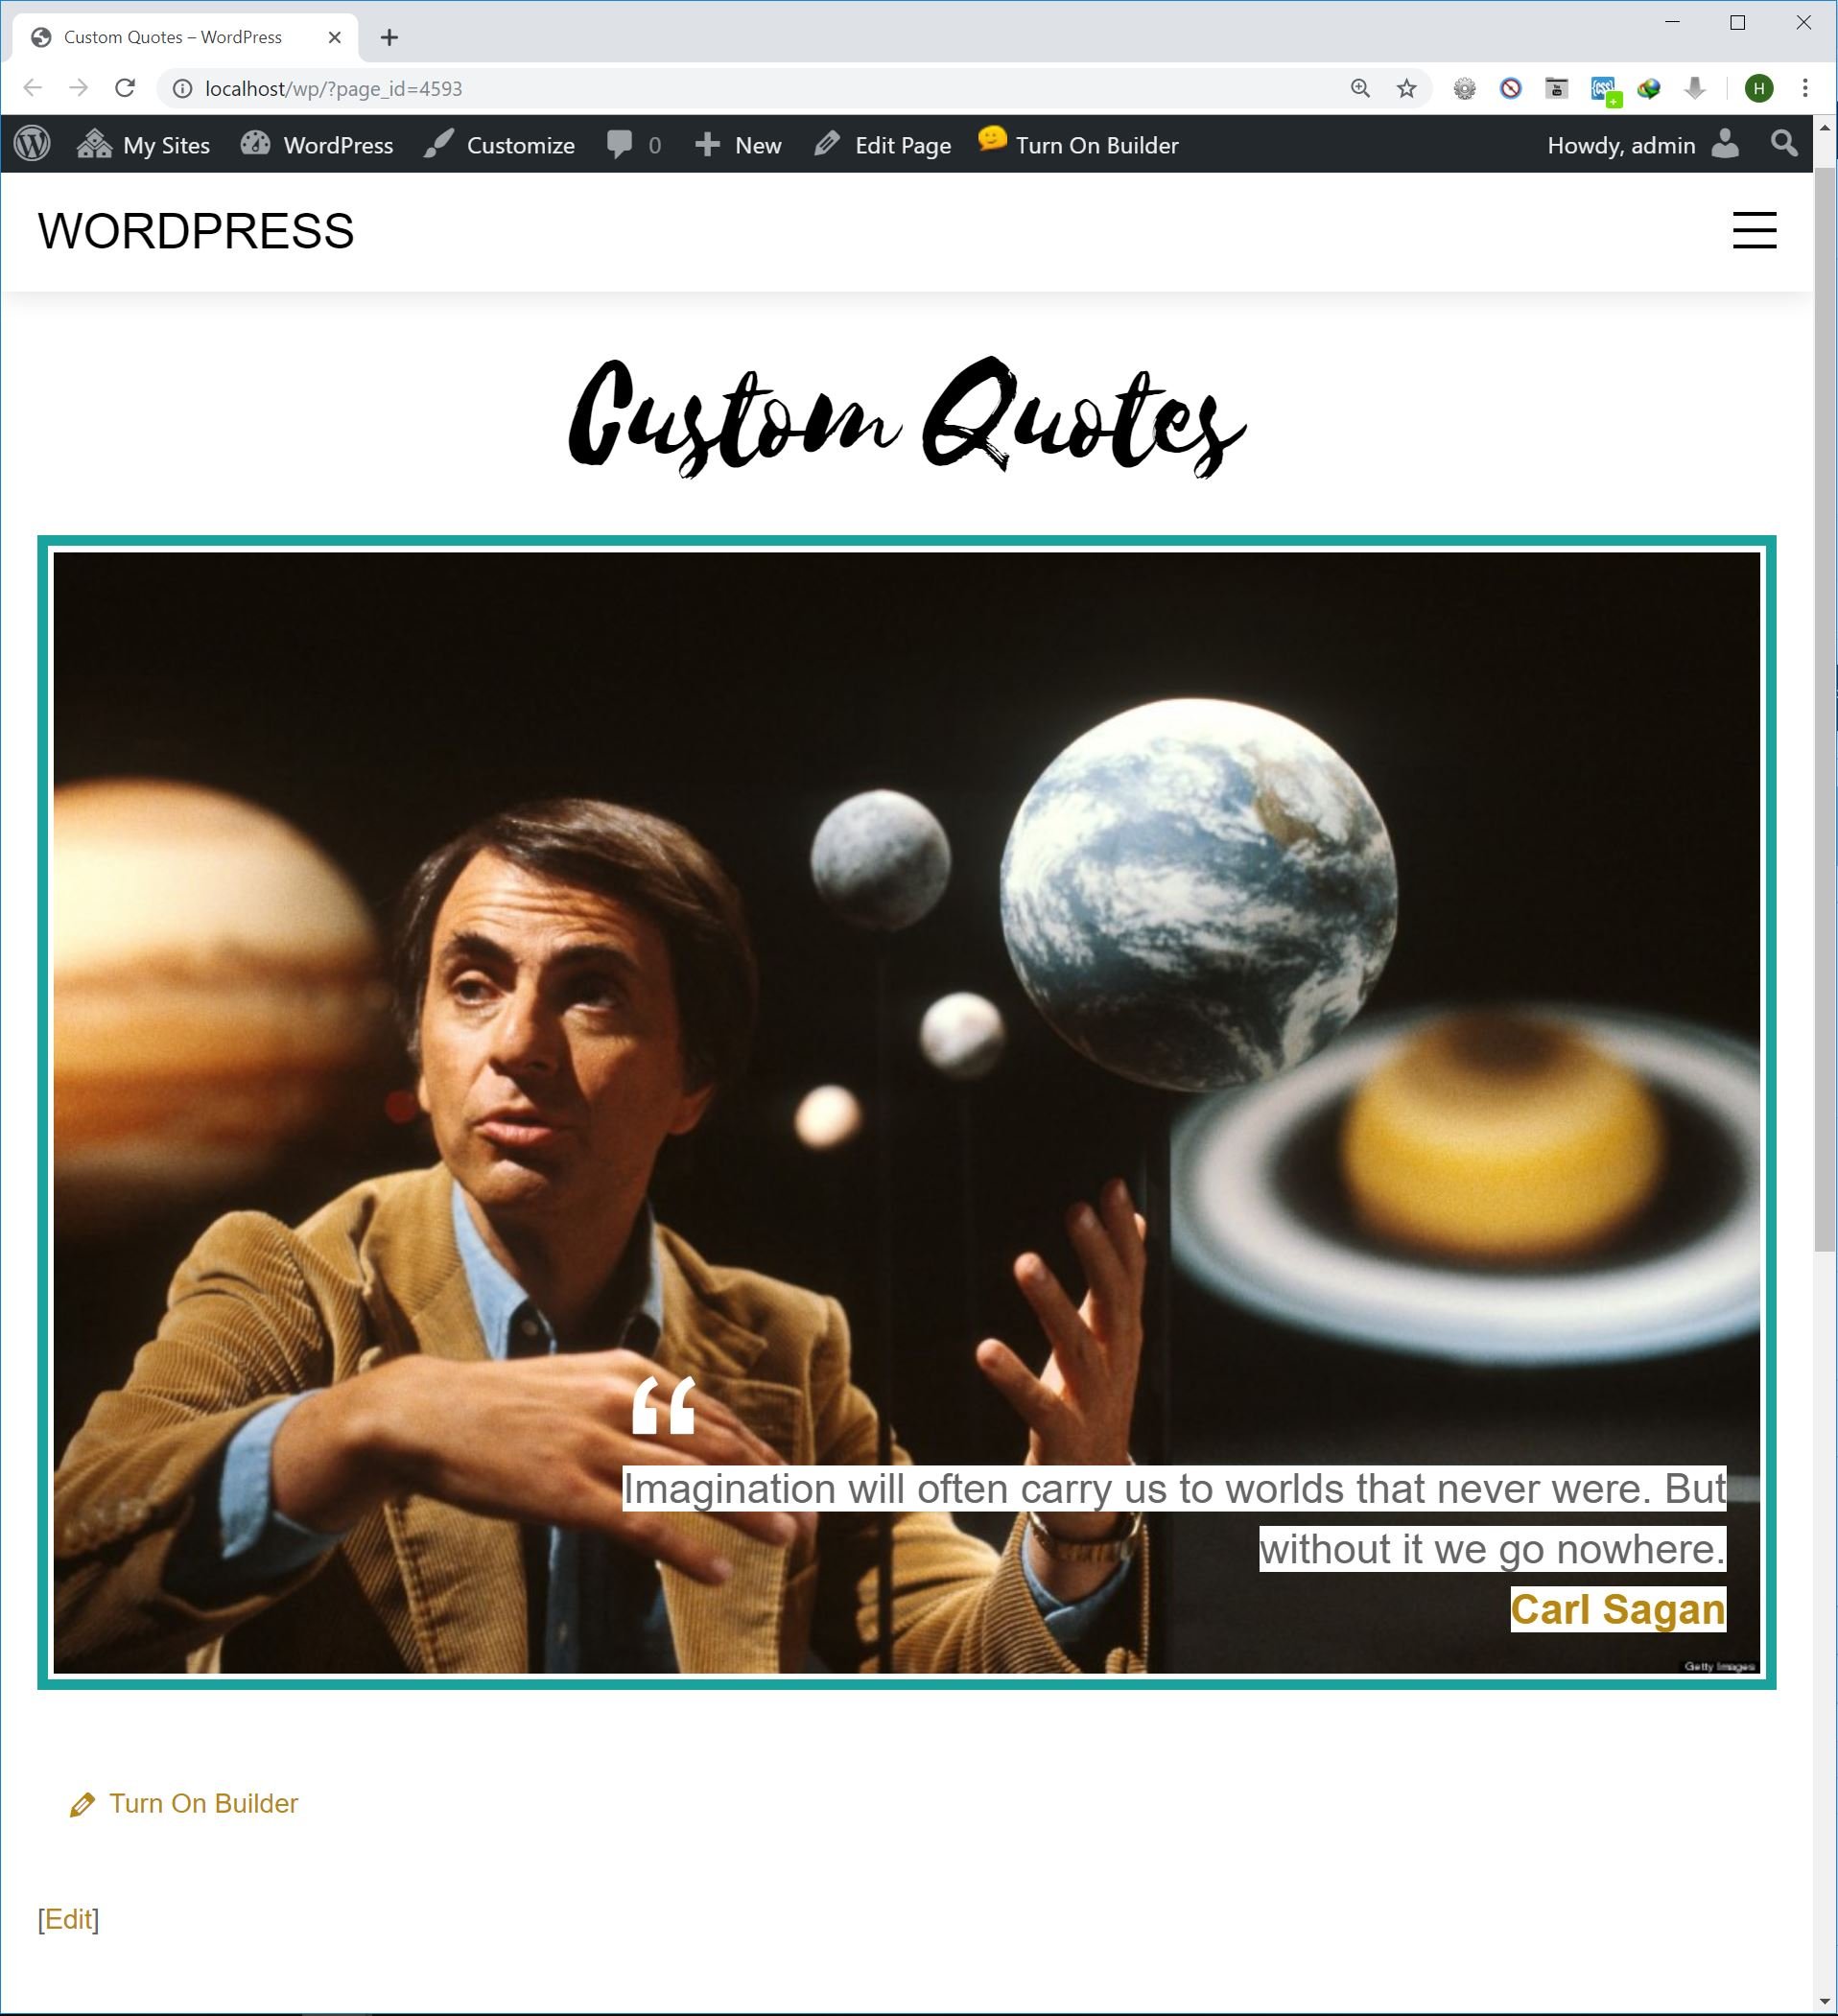
Custom Quotes module sample
The quote style consists of an image, the quote text itself and the name of it's author. The only problem is this requires a specific bit of HTML to make. Handing a txt file to the client to copy and paste, then change the bits and pieces is not very practical. An option is to create a shortcode that outputs the quote, however shortcodes are not user friendly either. Your client will have to remember the exact shortcode and parameters used to replicate the same output.
First step like our Hello World module, create a directory inside the wp-content/plugins/ folder, add an init.php file inside it and paste this in:
<?php
/*
Plugin Name:  Custom Quotes
Plugin URI:   https://themify.me/
Version:      1.0
Author:       Themify
Description:  Custom Quotes
*/

defined( 'ABSPATH' ) or die( '-1' );

function custom_quotes_enqueue() {
	wp_enqueue_style( 'custom-quotes', plugin_dir_url( __FILE__ ) . '/assets/style.css' );
}
add_action( 'wp_enqueue_scripts', 'custom_quotes_enqueue' );

function custom_quotes_register_module( $ThemifyBuilder ) {
	Themify_Builder_Model::register_directory( 'templates', plugin_dir_path( __FILE__ ) . '/templates' );
	Themify_Builder_Model::register_directory( 'modules', plugin_dir_path( __FILE__ ) . '/modules' );
}
add_action( 'themify_builder_setup_modules', 'custom_quotes_register_module' );
As before, we register two directories for Builder to load the module definition and it's template file, we also use the wp_enqueue_scripts hook to load an stylesheet from the /assets folder inside our plugin. Now activate the plugin in the Plugins manager.
Next create "module-quotes.php" file inside the the /modules folder and paste this in:
<?php
if ( ! defined( 'ABSPATH' ) ) exit; // Exit if accessed directly

class TB_Quotes_Module extends Themify_Builder_Component_Module {
	function __construct() {
		parent::__construct(array(
			'name' => __( 'Quote', 'custom-quotes' ),
			'slug' => 'quotes',
			'category' => array( 'addon' )
		));
	}

	public function get_visual_type() {
		return 'ajax';
	}

	public function get_options() {
		return array(
			array(
				'id' => 'quote_text',
				'type' => 'textarea',
				'label' => __( 'Text', 'custom-quotes' ),
				'class' => '',
			),
			array(
				'id' => 'quote_image',
				'type' => 'image',
				'label' => __( 'Image', 'custom-quotes' ),
				'class' => '',
			),
			array(
				'id' => 'quote_author',
				'type' => 'text',
				'label' => __( 'Quote Author', 'custom-quotes' ),
				'class' => '',
			),
			array(
				'id' => 'quote_link',
				'type' => 'text',
				'label' => __( 'Link', 'custom-quotes' ),
				'class' => '',
			),
		);
	}
}

Themify_Builder_Model::register_module( 'TB_Quotes_Module' );
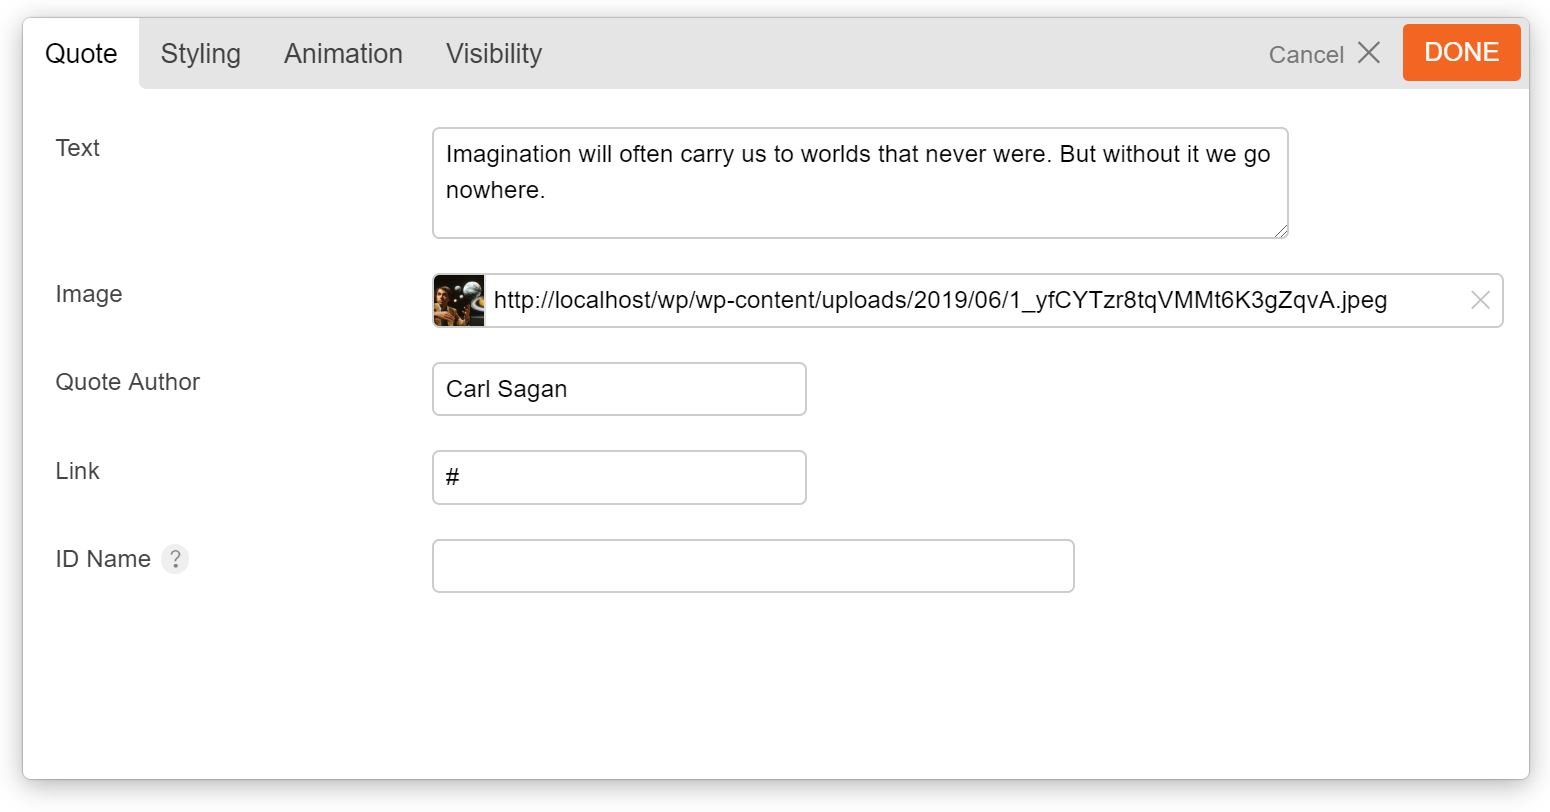
First we extend the Themify_Builder_Module class, then register it using Themify_Builder_Model::register_module( 'TB_Quotes_Module' ); call, and also add four options in the module, three text options to put the quote text, the name of it's author, and the link to the quote author's website, and an option to put the image. Now when you add the module you can see the options:
Perfect! Now for the module's template, create "template-quotes.php" in the /templates folder and add:
<?php
if ( ! defined( 'ABSPATH' ) ) exit; // Exit if accessed directly
/**
 * Template Quotes
 *
 * Access original fields: $args['mod_settings']
 */

$fields_default = array(
	'quote_text' => '',
	'quote_image' => '',
	'quote_author' => '',
	'quote_link' => '',
	'animation_effect' => ''
);

$fields_args = wp_parse_args( $args['mod_settings'], $fields_default );
unset( $args['mod_settings'] );

$container_class = apply_filters( 'themify_builder_module_classes', array(
		'module', 'module-' . $args['mod_name'], $args['module_ID'], self::parse_animation_effect( $fields_args['animation_effect'] )
	), $args['mod_name'], $args['module_ID'], $fields_args );
if ( ! empty( $args['element_id'] ) ) {
	$container_class[] = 'tb_' . $args['element_id'];
}
if ( ! empty( $fields_args['global_styles'] ) && Themify_Builder::$frontedit_active === false ) {
	$container_class[] = $fields_args['global_styles'];
}
$container_props = apply_filters( 'themify_builder_module_container_props', array(
	'id' => $args['module_ID'],
	'class' => implode(' ', $container_class),
), $fields_args, $args['mod_name'], $args['module_ID'] );
?>

<div <?php echo self::get_element_attributes( $container_props, $fields_args ); ?>>
	<?php $container_props=$container_class=null;?>
	<?php do_action( 'themify_builder_before_template_content_render' ); ?>
	<div class="quote-wrap">

		<?php if( '' !== $fields_args['quote_image'] ) : ?>
			<img class="quote-image" src="<?php echo esc_url( $fields_args['quote_image'] ); ?>" alt="<?php echo $fields_args['quote_author']; ?>" />
		<?php endif; ?>

		<div class="quote-content">

			<div class="quote-text">
				<span><?php echo $fields_args['quote_text']; ?></span>
			</div>

			<div class="quote-author">
				<?php if ( '' ===$fields_args['quote_link']  ) : ?>
					<span><?php echo $fields_args['quote_author']; ?></span>
				<?php else : ?>
					<a href="<?php echo $fields_args['quote_link']; ?>"><span><?php echo $fields_args['quote_author']; ?></span></a>
				<?php endif; ?>
			</div>

		</div>

	</div>

	<?php do_action( 'themify_builder_after_template_content_render' ); ?>
</div><!-- .module-<?php echo $args['mod_name']; ?> -->
The snippet is pretty straight forward, we just check if some options in the module are set and if so output the proper markup.
NOTE: To set the default options for the module we use wp_parse_args function and pass it two things: $args['mod_settings'] array that holds the saved settings of the module, and an array of defaults, this way we'll have a default value. Also the extract function is used to turn each of the options into a separate variable, this makes working with them easier.
The rest of the code is just spitting out the proper markup we need to show the quote.
Last step is to add the CSS codes that style the quote, in the plugin we have used wp_enqueue_style to add an stylesheet to the front-end. So first create a folder named "assets" in the plugin, then create a file named "style.css" in there and add the CSS codes. You can get that from the this link.
You can download the finished plugin here which includes an alternative layout for quotes, and also sets up the Styling options for the module.
Field Types
The Builder has a variety of field types you can use to create the options for the modules, the table below lists some of available field types:
| Type | Description | * Repeatable? |
|---|---|---|
| text | General text box to input texts. You can set the "colorpicker" parameter to true to turn the text box into a color picker field. |
Yes |
| icon | Icon picker, user can choose from the icons included in the Builder. For an example of this check the Feature module. | Yes |
| image | Image uploader, user can upload images or select one from the Media Library. | Yes |
| textarea | Multi-line text input. | Yes |
| wp_editor | Shows the TinyMCE editor to input formatted texts. | Yes |
| radio | Multiple choice option where only one can be chosen. | Yes |
| checkbox | Multiple choice option where none or any number of the choices can be chosen. | Yes |
| builder | "builder" field can be used to create repeatable rows of data (for example Accordion and Tabs modules use this feature), field types that in this table are highlighted as Repeatble can be used in the "builder" field type. |
* whether the field type is repeatable and can be used in "builder" fields.
Override module templates in themes
The built-in Builder modules are also customizable, where you can change the look using the options provided by the module. However sometimes you need to change how the modules structure its output, and in such cases overriding the template files of the modules comes very handy. To achieve this first navigate to <theme_root>/themify/themify-builder/templates/ directory, here you can find the template files used by various modules. Now copy the template file for the module you want to change and paste it in <child_theme_root>/themify-builder/ directory and customize it.